
What is a crimping tool? It compresses a metal connector around a stripped conductor until both metals deform into one solid, solderless joint that carries current as well as the wire itself. The answer below is bounded to electrical work: which tool each panel connection needs, what the standards require, and when the job needs no crimping tool.
What is a crimping tool?
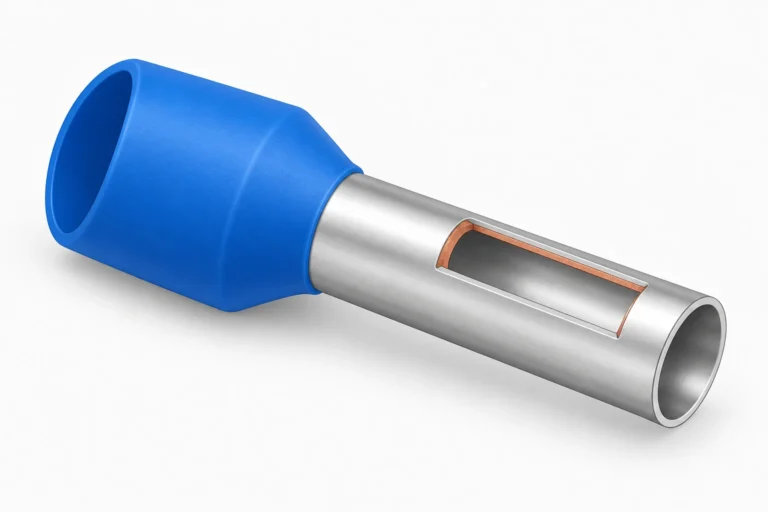
A crimping tool is a hand or powered tool that squeezes a metal connector onto a conductor, deforming the connector barrel until it grips the strands and forms a permanent electrical termination. A shaped cavity in the tool, called the die, controls the finished geometry; the operator’s hand pressure does not. The connector decides which tool you need.
The name travels well outside electrical work. Hairdressing crimpers, plumbing press fittings and jewellery pliers all carry it, and none of them appear below. Everything here applies to electrical termination inside panels and enclosures.
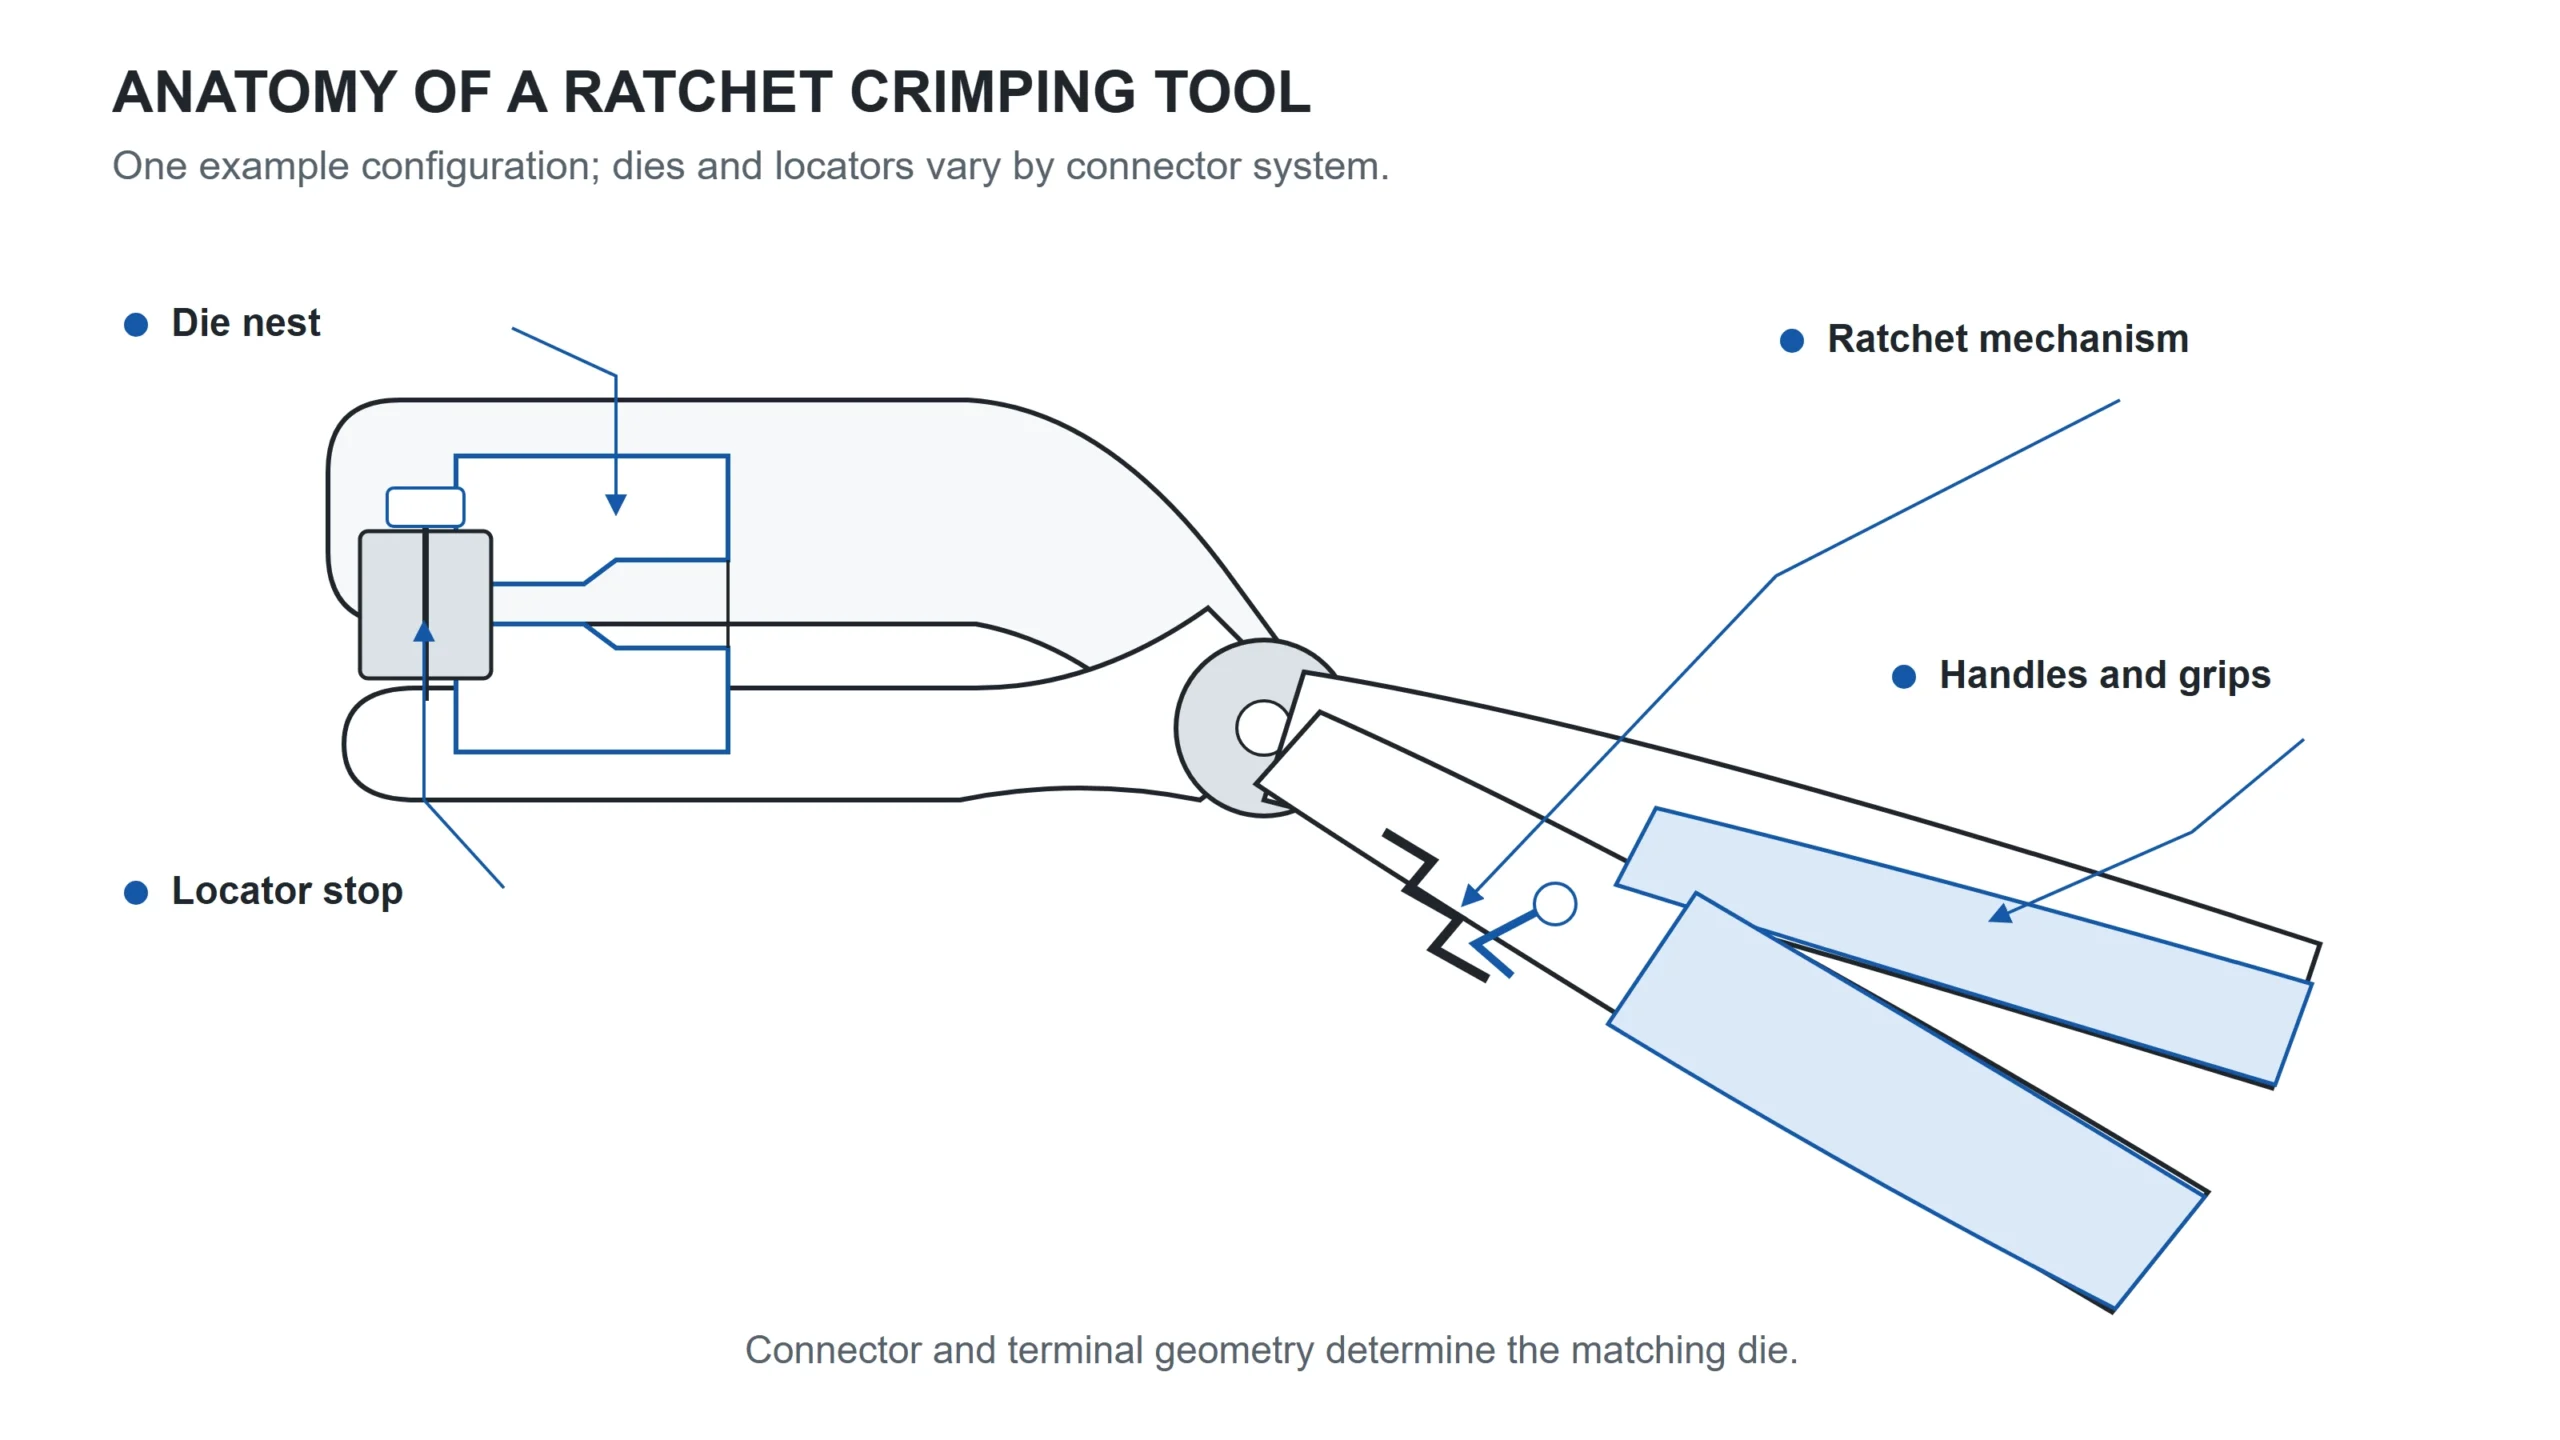
Four parts do the work on a hand tool. The die nest is the shaped cavity that forms the crimp, sized for a specific connector family and conductor range. The handles multiply your grip into the several kilonewtons a small barrel needs. A ratchet mechanism holds the jaws closed until the cycle completes, so the tool decides when the crimp is finished instead of your thumb. A locator or depth stop positions the connector square in the die, which is what keeps the crimp centred on the barrel and off the edge.
A powered crimping tool changes the force source and nothing else. A hydraulic head or a battery pump replaces your hands, the die still decides the shape, and the joint forms the same way.
How a crimping tool works
A crimping tool does more than apply brute compression. Three things happen in sequence, and the third is the one that matters.
First the crimping tool multiplies force. Long handles, a ratchet linkage, a hydraulic ram or an electric pump turn a manageable input into enough pressure to move copper. Second, the die converts that pressure into a defined shape. Because the cavity is fixed and sized to the connector, two crimps made with the same die and the same connector come out the same, which is why die selection matters more than technique.
Third, the metals cold weld. Under sufficient pressure the oxide films on the strand surfaces and the inside of the barrel break up, and clean copper meets clean copper closely enough to bond without heat. The result is a gas-tight joint:
That last line is the whole point of the tool. A joint that merely holds mechanically will pass a tug on the day it is made and then heat up under load months later as oxide grows across the contact faces. IEC 60352-2 is the standard covering solderless crimped connections and the performance a correct crimp is expected to deliver.
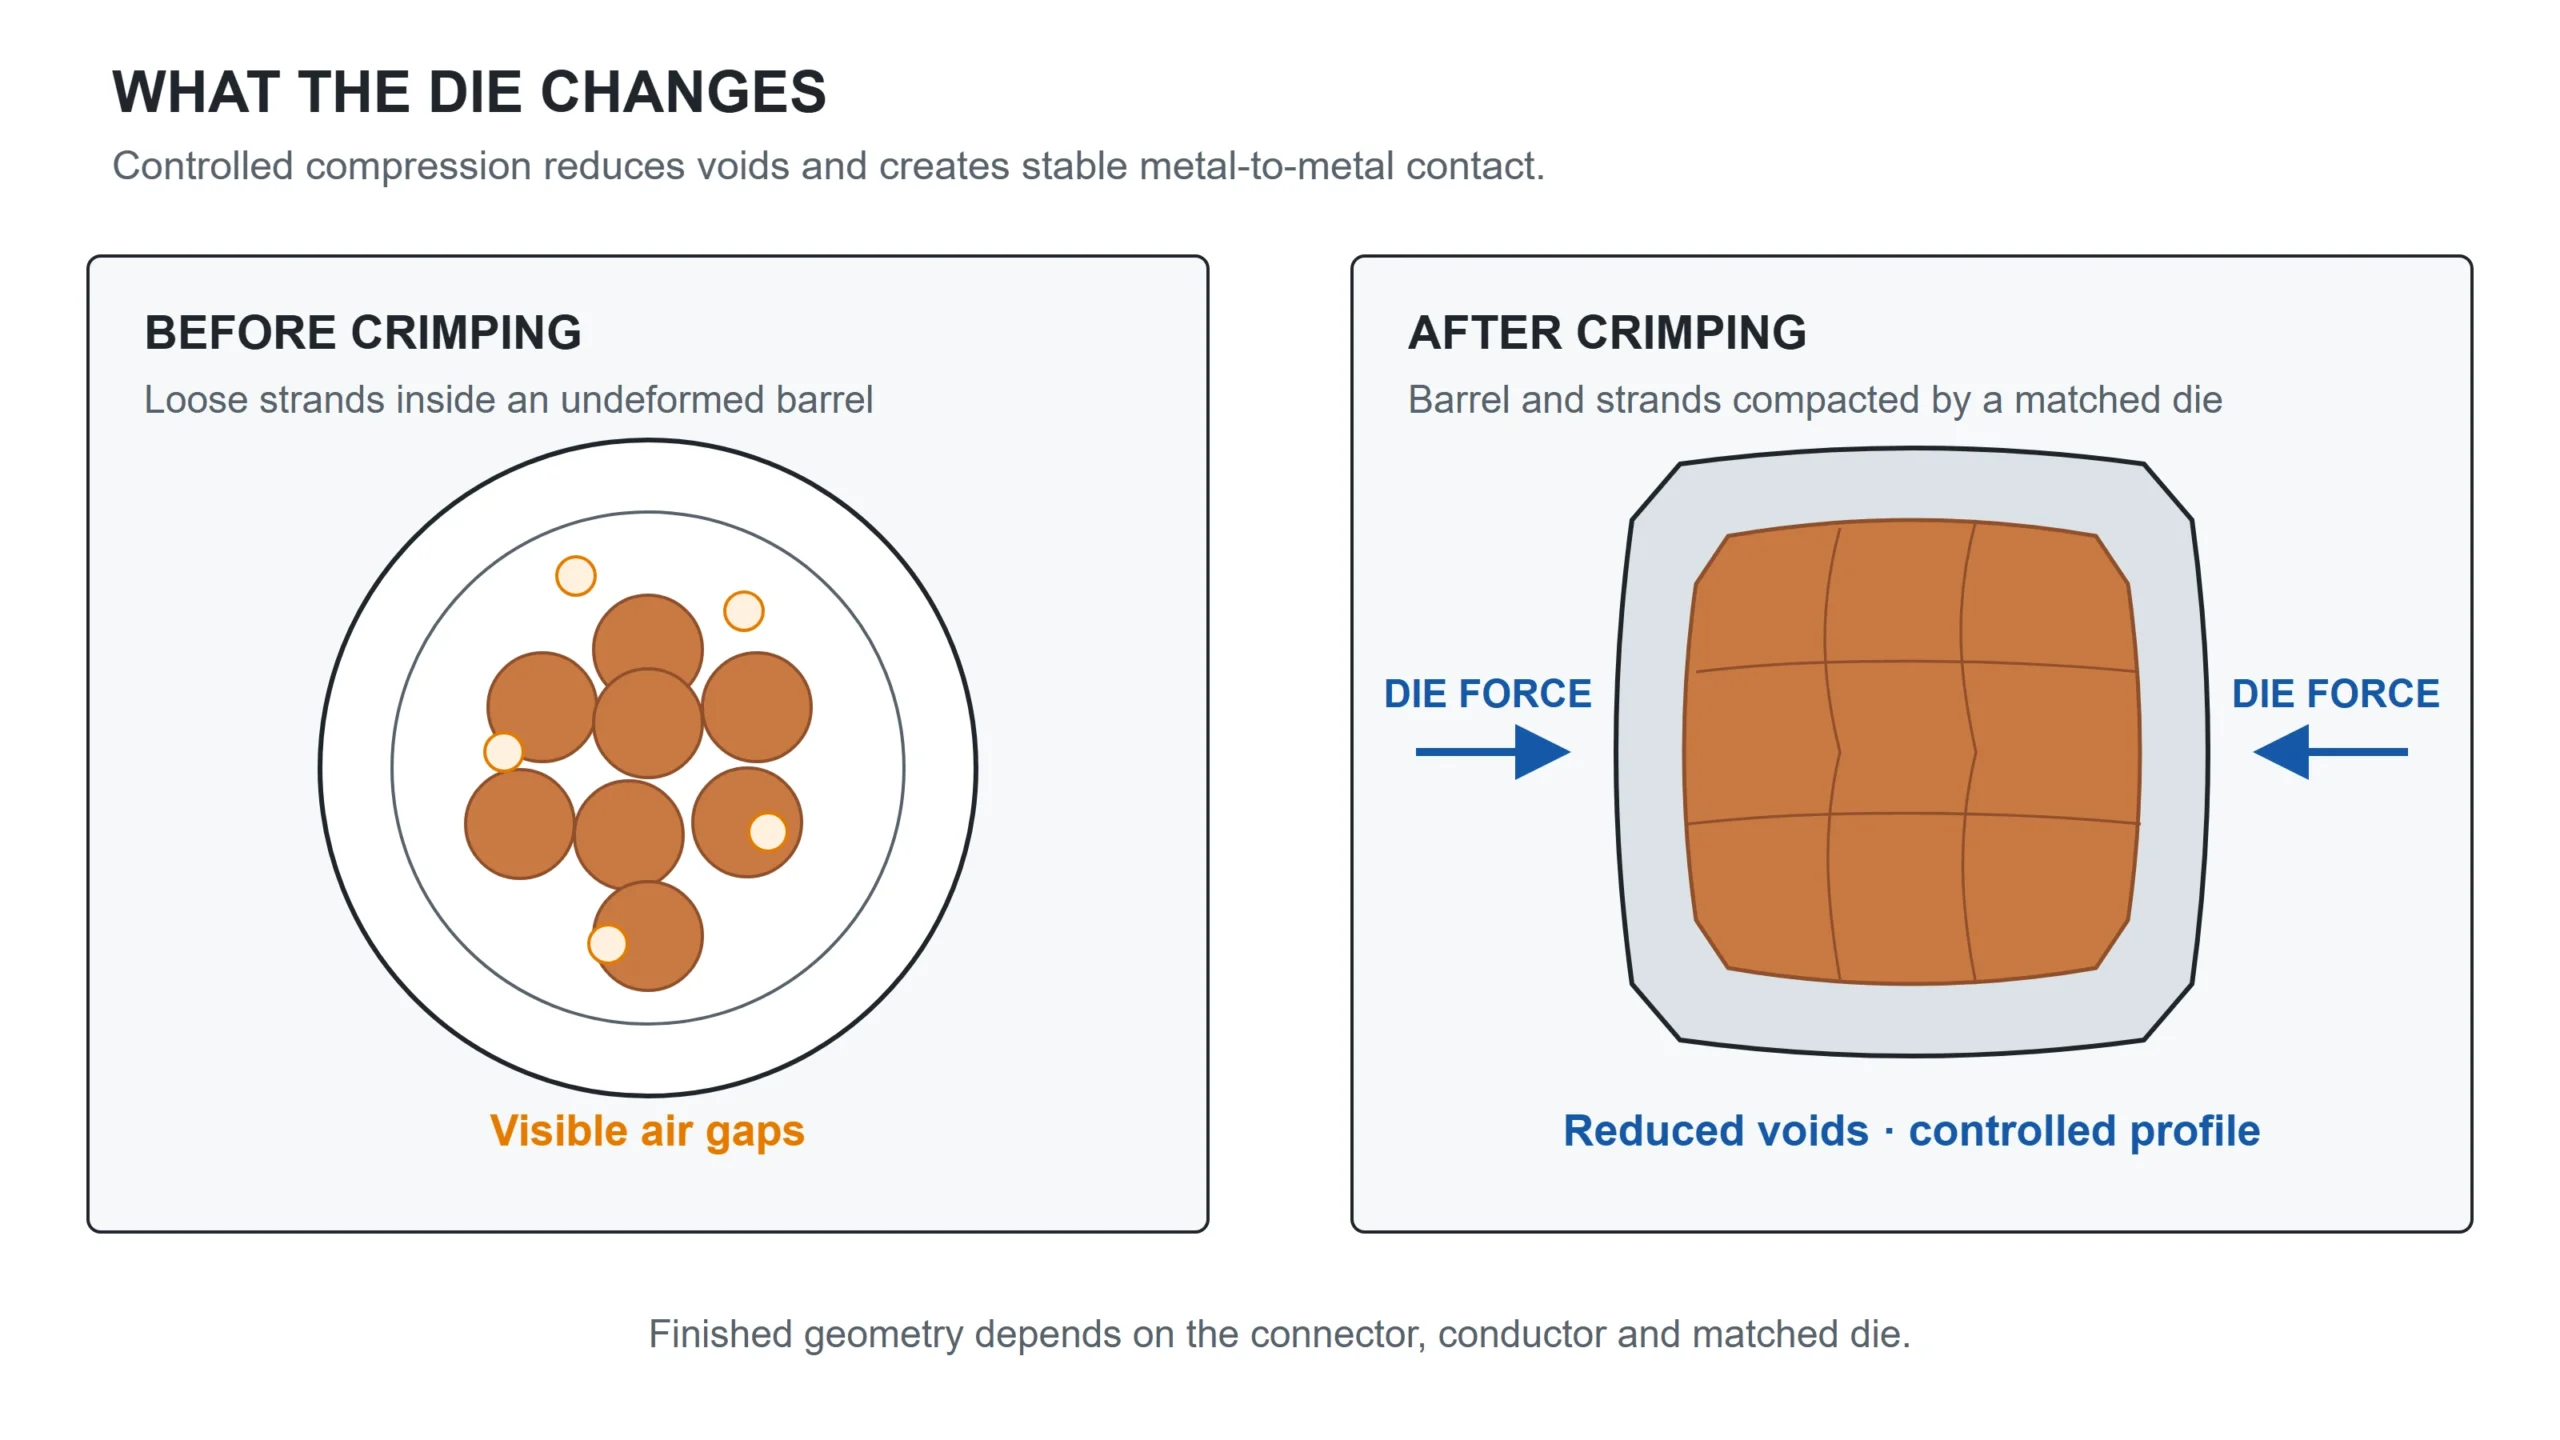
As shown in Figure 2, the strands start as a loose bundle with air between them and finish as a single compacted section.
Crimping tool types for electrical panel work
Most guides sort crimping tools by how they generate force, which puts hydraulic presses in front of a reader who came to wire a control cabinet. The right crimping tool follows the connection instead, which makes the choice shorter.
Terminal-block conductors
Fine-stranded conductor landing in a terminal block is the bulk of panel work, and it takes a ferrule crimper — sold as a wire ferrule crimper in North American catalogues and a bootlace crimper across the UK and IEC market. What ferrules are and where they belong is covered in the wire ferrule guide; which crimper to buy, sizing, and technique are covered in the ferrule crimper guide.
Pre-insulated terminals and disconnects
Ring, spade and disconnect terminals with an insulating sleeve need a ratchet crimper with insulated dies, usually across 22 AWG to 10 AWG. The die is shaped to compress the barrel without splitting the sleeve, and dies are colour-matched to the red, blue and yellow terminal sizes.
Earth bars and power feeds
Larger conductors move into cable lugs, which is a different tool class again: long-handle mechanical crimpers at the smaller end, hydraulic or battery heads above that. Capacity, not speed, is the selection driver, and the die size is normally stamped into the finished crimp so an inspector can read it.
Data and comms
RJ45 and similar modular plugs take modular crimpers. They share the name with everything above and nothing else; the die geometry has no relationship to a barrel crimp.
| Connection in the panel | Tool class | Typical crimp profile |
|---|---|---|
| Fine-stranded conductor into a terminal block | Ferrule crimper, also called a bootlace crimper | Square, hexagonal or trapezoidal |
| Pre-insulated ring, spade or disconnect | Ratchet crimper, insulated dies | Oval, double-dot |
| Non-insulated crimp terminal | Ratchet crimper, non-insulated dies | Indent |
| Cable lug on earth bar or feeder | Mechanical or hydraulic lug crimper | Hexagonal or indent |
| RJ45 and modular plugs | Modular crimper | Modular, 8P8C |
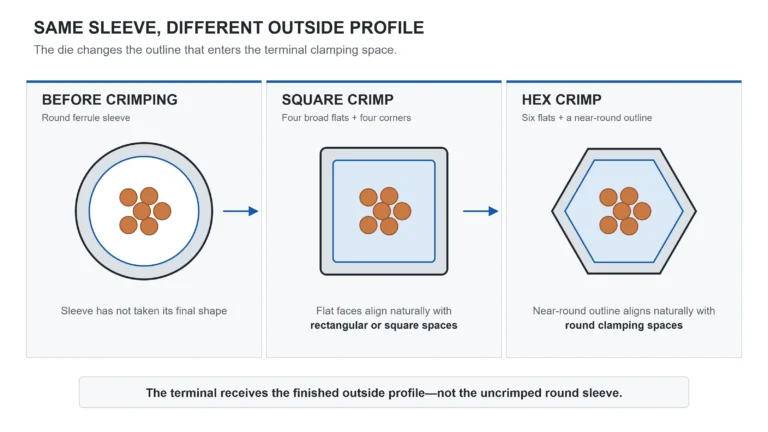
One point of attribution, because it is often stated loosely. DIN 46228 governs the ferrule itself, its dimensions, materials and application range. It does not tell a tool which crimp shape to produce. The profile comes from the tool and the terminal manufacturer: a ferrule can meet DIN 46228 and be crimped square, hexagonal or trapezoidal by different tools, and each is legitimate when the terminal accepts that shape. The square vs hex ferrule crimp comparison explains how the finished outline interacts with the clamping space.
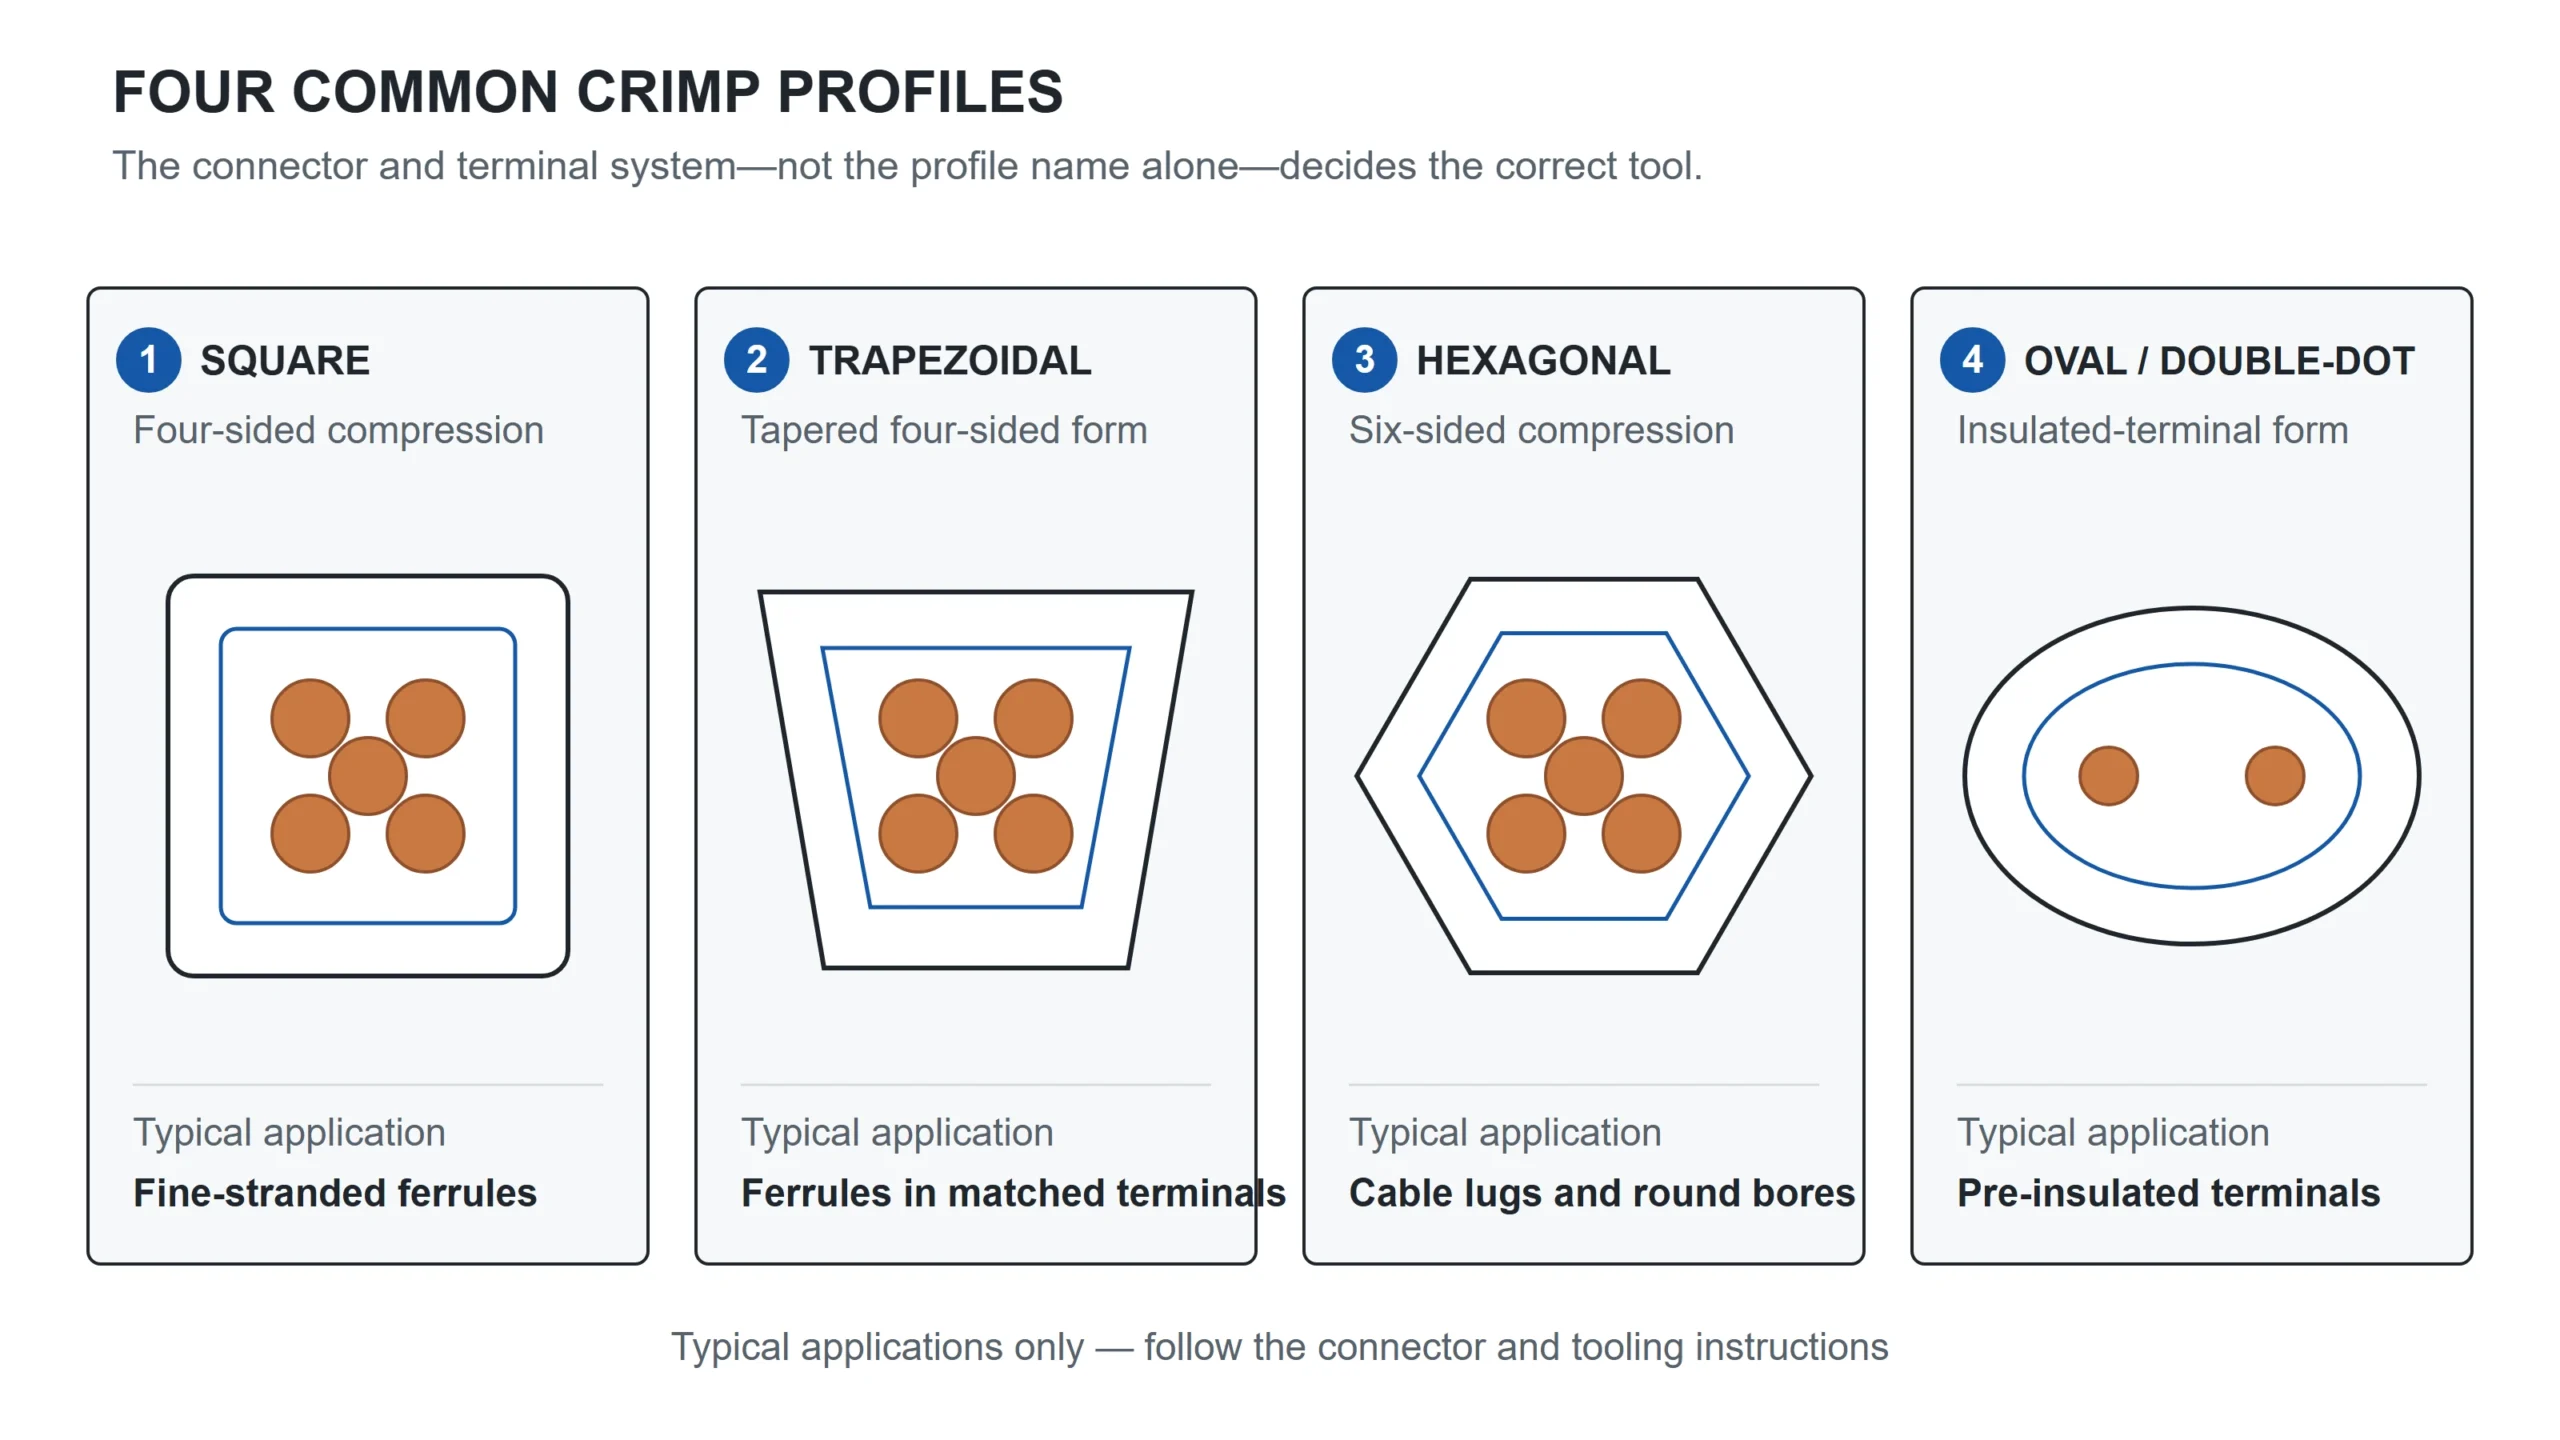
Figure 3 shows the four profiles at the same scale. The differences look cosmetic and are not: hexagonal dies are used for lug barrels and for ferrule systems that need a near-round outline, while square and trapezoidal dies form the flatter profiles common in ferrule work. The receiving terminal and matched tooling system decide which one belongs on the connection.
Do you need a crimping tool?
A crimping tool is not always required, and the honest answer is worth more than a sales pitch.
Start with what goes wrong when you improvise, because that is the real question behind most of it.
| Improvised method | What actually happens |
|---|---|
| Pliers or side cutters | Force lands at one uncontrolled point, so the barrel flattens instead of closing evenly. The joint holds mechanically but is not gas-tight, and resistance climbs as oxide grows |
| Twisting strands and inserting bare | Strands splay under the clamp, contact area drops, and the clamp screw bites individual strands |
| Solder on stranded wire into a clamp | Solder wicks up the conductor and creates a stiff transition that fatigues under vibration, and the solder creeps under sustained clamp pressure |
| Tape or a wire nut in a panel | No defined contact geometry at all, and not accepted in enclosure wiring |
Now the part most guides skip: a correct crimp costs something too. You pay for the tool before the first termination, and one tool rarely covers a panel, since each connector family wants its own die set. The joint is also permanent by design. Get the size wrong and the fix is to cut the connector off and re-terminate, which shortens the conductor every time. On a short tail in a crowded enclosure, you run out of conductor fast.
And there is a legitimate case for no ferrule at all. Some terminals accept bare stranded conductor directly, where the terminal manufacturer permits that conductor class and preparation. That permission is specific to the terminal, the conductor class and how the conductor is prepared, so it is read from the terminal datasheet; the clamp type alone will not settle it. The terminal-by-terminal answer covers which cases those are and where a ferrule actively makes things worse.
What the standards actually require
Crimping tool selection is not left to workmanship. Four standards sit behind the choice, and knowing which one governs what keeps a specification honest.
| Standard | What it governs | What it means when choosing a tool |
|---|---|---|
| IEC 60352-2 | Solderless crimped connections: requirements and test methods | The performance the finished joint is expected to meet, independent of brand |
| DIN 46228 | Wire-end ferrules: dimensions, materials, application range | Fixes the ferrule the die has to fit; does not dictate the crimp profile |
| IEC 60947-7-1 | Terminal blocks for copper conductors | What the receiving terminal expects from the prepared conductor |
| UL 486F | Wire ferrules for the North American market | Whether a ferrule is listed for use in a UL panel build |
| IPC/WHMA-A-620 | Acceptability of cable and wire harness assemblies | Pull-force acceptance values and the method for testing them |
Two of these are worth a sentence more.
IEC 60352-2 is the one that defines what a crimped connection has to achieve, which is why a gas-tight joint is a specification and not a marketing phrase. IPC/WHMA-A-620 is where formal acceptance lives, and it is a test with defined values and a calibrated instrument, not something a hand pull satisfies.
On UL: Termnex supplies wire ferrules that are cULus Listed to UL 486F on selected HE insulated single-wire models from 0.5 mm² to 6 mm². Coverage is assigned per part number rather than per size band, so some models inside that range are not listed, and the twin and non-insulated series are not covered at all. Ask for a specific part number to be confirmed before specifying it into a UL 508A build; the certificate and file record are supplied with the quotation so the listing can be verified.
How to choose a crimping tool
Three questions in order, and the order matters. Answering them out of sequence is how people end up owning a tool that does not fit the connector they actually use.
What connectors, and what conductor range?
Connector family and conductor size set the tool class and eliminate most of the catalogue immediately. A panel running 0.5 mm² to 2.5 mm² control wiring into terminal blocks needs a ferrule crimper and does not need a hydraulic head, whatever the incomer looks like.
How many crimps in a working day?
Under about thirty, a plain ratchet tool is fine. Above that, hand fatigue starts producing inconsistent results with fixed-die tools, and a self-adjusting or powered tool earns its cost in consistency before it earns it in speed.
Does the work need to be documented?
For contract or certified builds, choose tools with marked, matched die sets, so a finished crimp can be traced back to a die size during inspection. The same requirement usually justifies a calibrated pull tester on site instead of a hand check.
| Requirement | What to look for | Why |
|---|---|---|
| Consistent crimps from mixed operators | Ratchet lock-out | The jaws stay closed until the cycle finishes, which reduces incomplete-cycle risk |
| Mixed ferrule sizes on one job | Self-adjusting die | No selector to set wrong between sizes |
| One repeated size, high volume | Fixed die with locator stop | Faster per crimp and positions the barrel squarely every time |
| Inspectable work | Marked die sets | Die size readable on the finished crimp |
| Lugs above hand capacity | Hydraulic or battery head | Hand tools under-crimp at the top of their stated range |
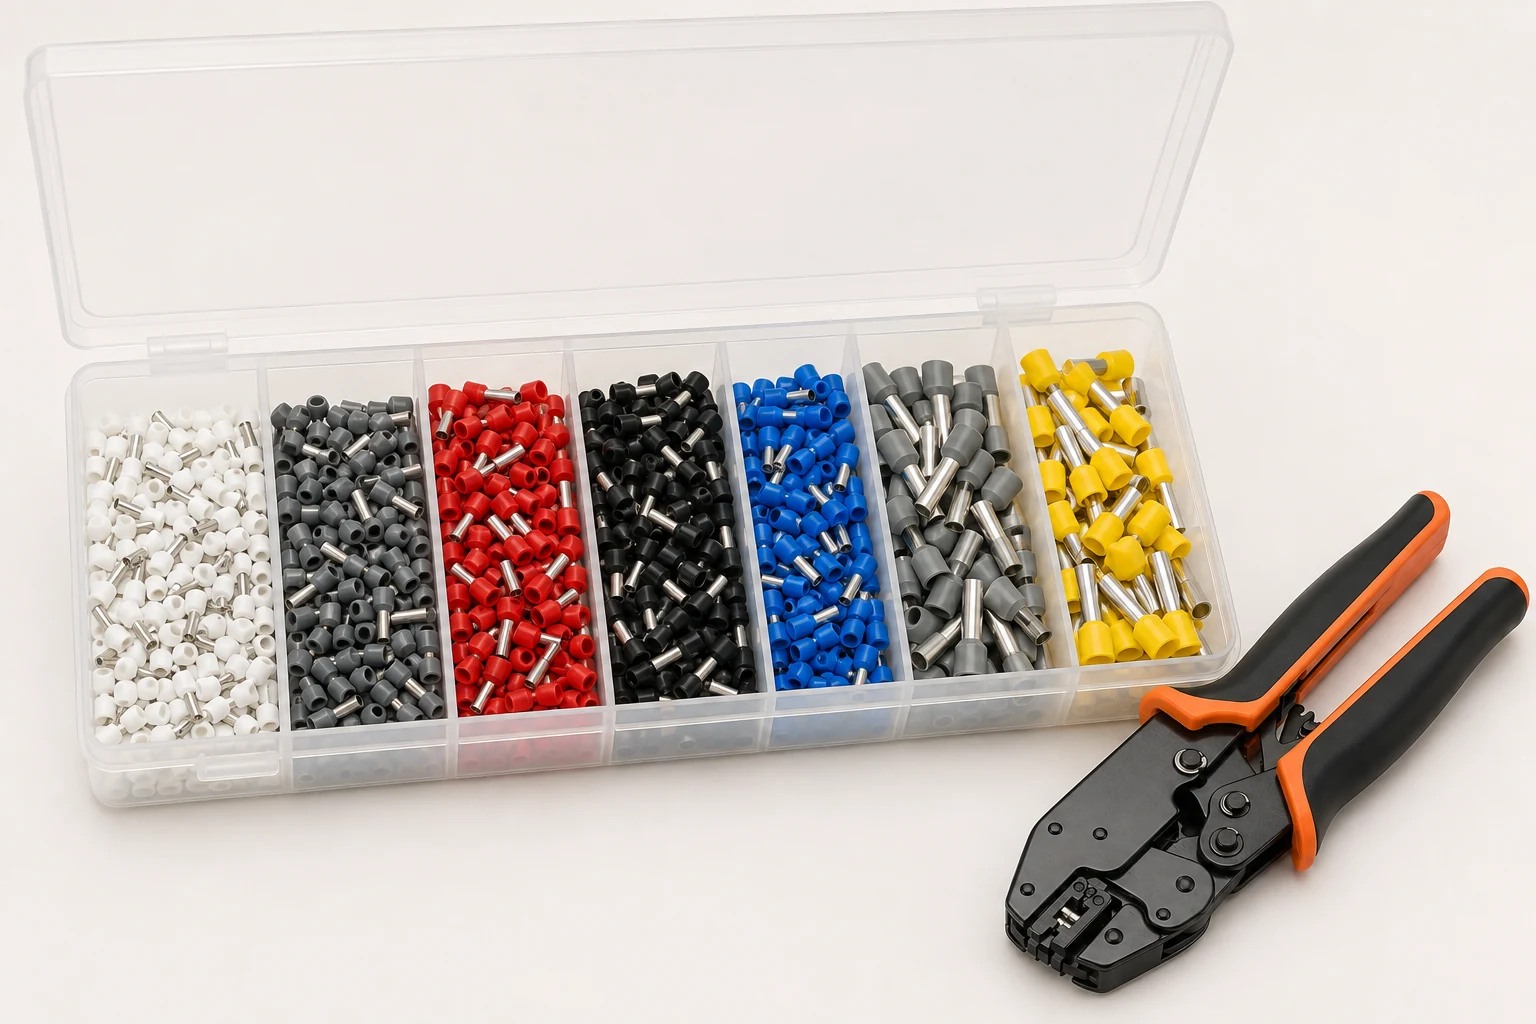
For standalone tools, compare the wire ferrule crimping tool range by conductor range and mechanism. Where a panel needs a working set of sizes, the wire ferrule kits cover assorted cross-sections in the DIN colour system, with a crimper included in the tool kit option.
Common crimping tool mistakes
A crimp can look finished and still be defective, which is why inspection is part of the job.
The failure modes are few and repeat constantly:
- Wrong die size. Too large leaves the barrel loose around the strands; too small cuts strands or cracks the barrel. Fix: match conductor, connector and die marking, and confirm all three agree before cycling the tool.
- Strip length wrong. Too short leaves conductor outside the barrel; too long leaves bare copper past the collar. Fix: strip to the barrel length specified for that connector.
- Insulation inside the crimp. The die compresses jacket instead of copper, and the joint looks correct from outside. Fix: re-strip and re-crimp on a fresh section.
- Off-centre crimp. The barrel is crimped half over the die edge, so compression is uneven along the joint. Fix: use the locator stop instead of eyeballing the position.
- Incomplete cycle. Pressure released before the ratchet completed. Fix: use a tool with lock-out, and cut off any crimp made on a tool that was forced open.
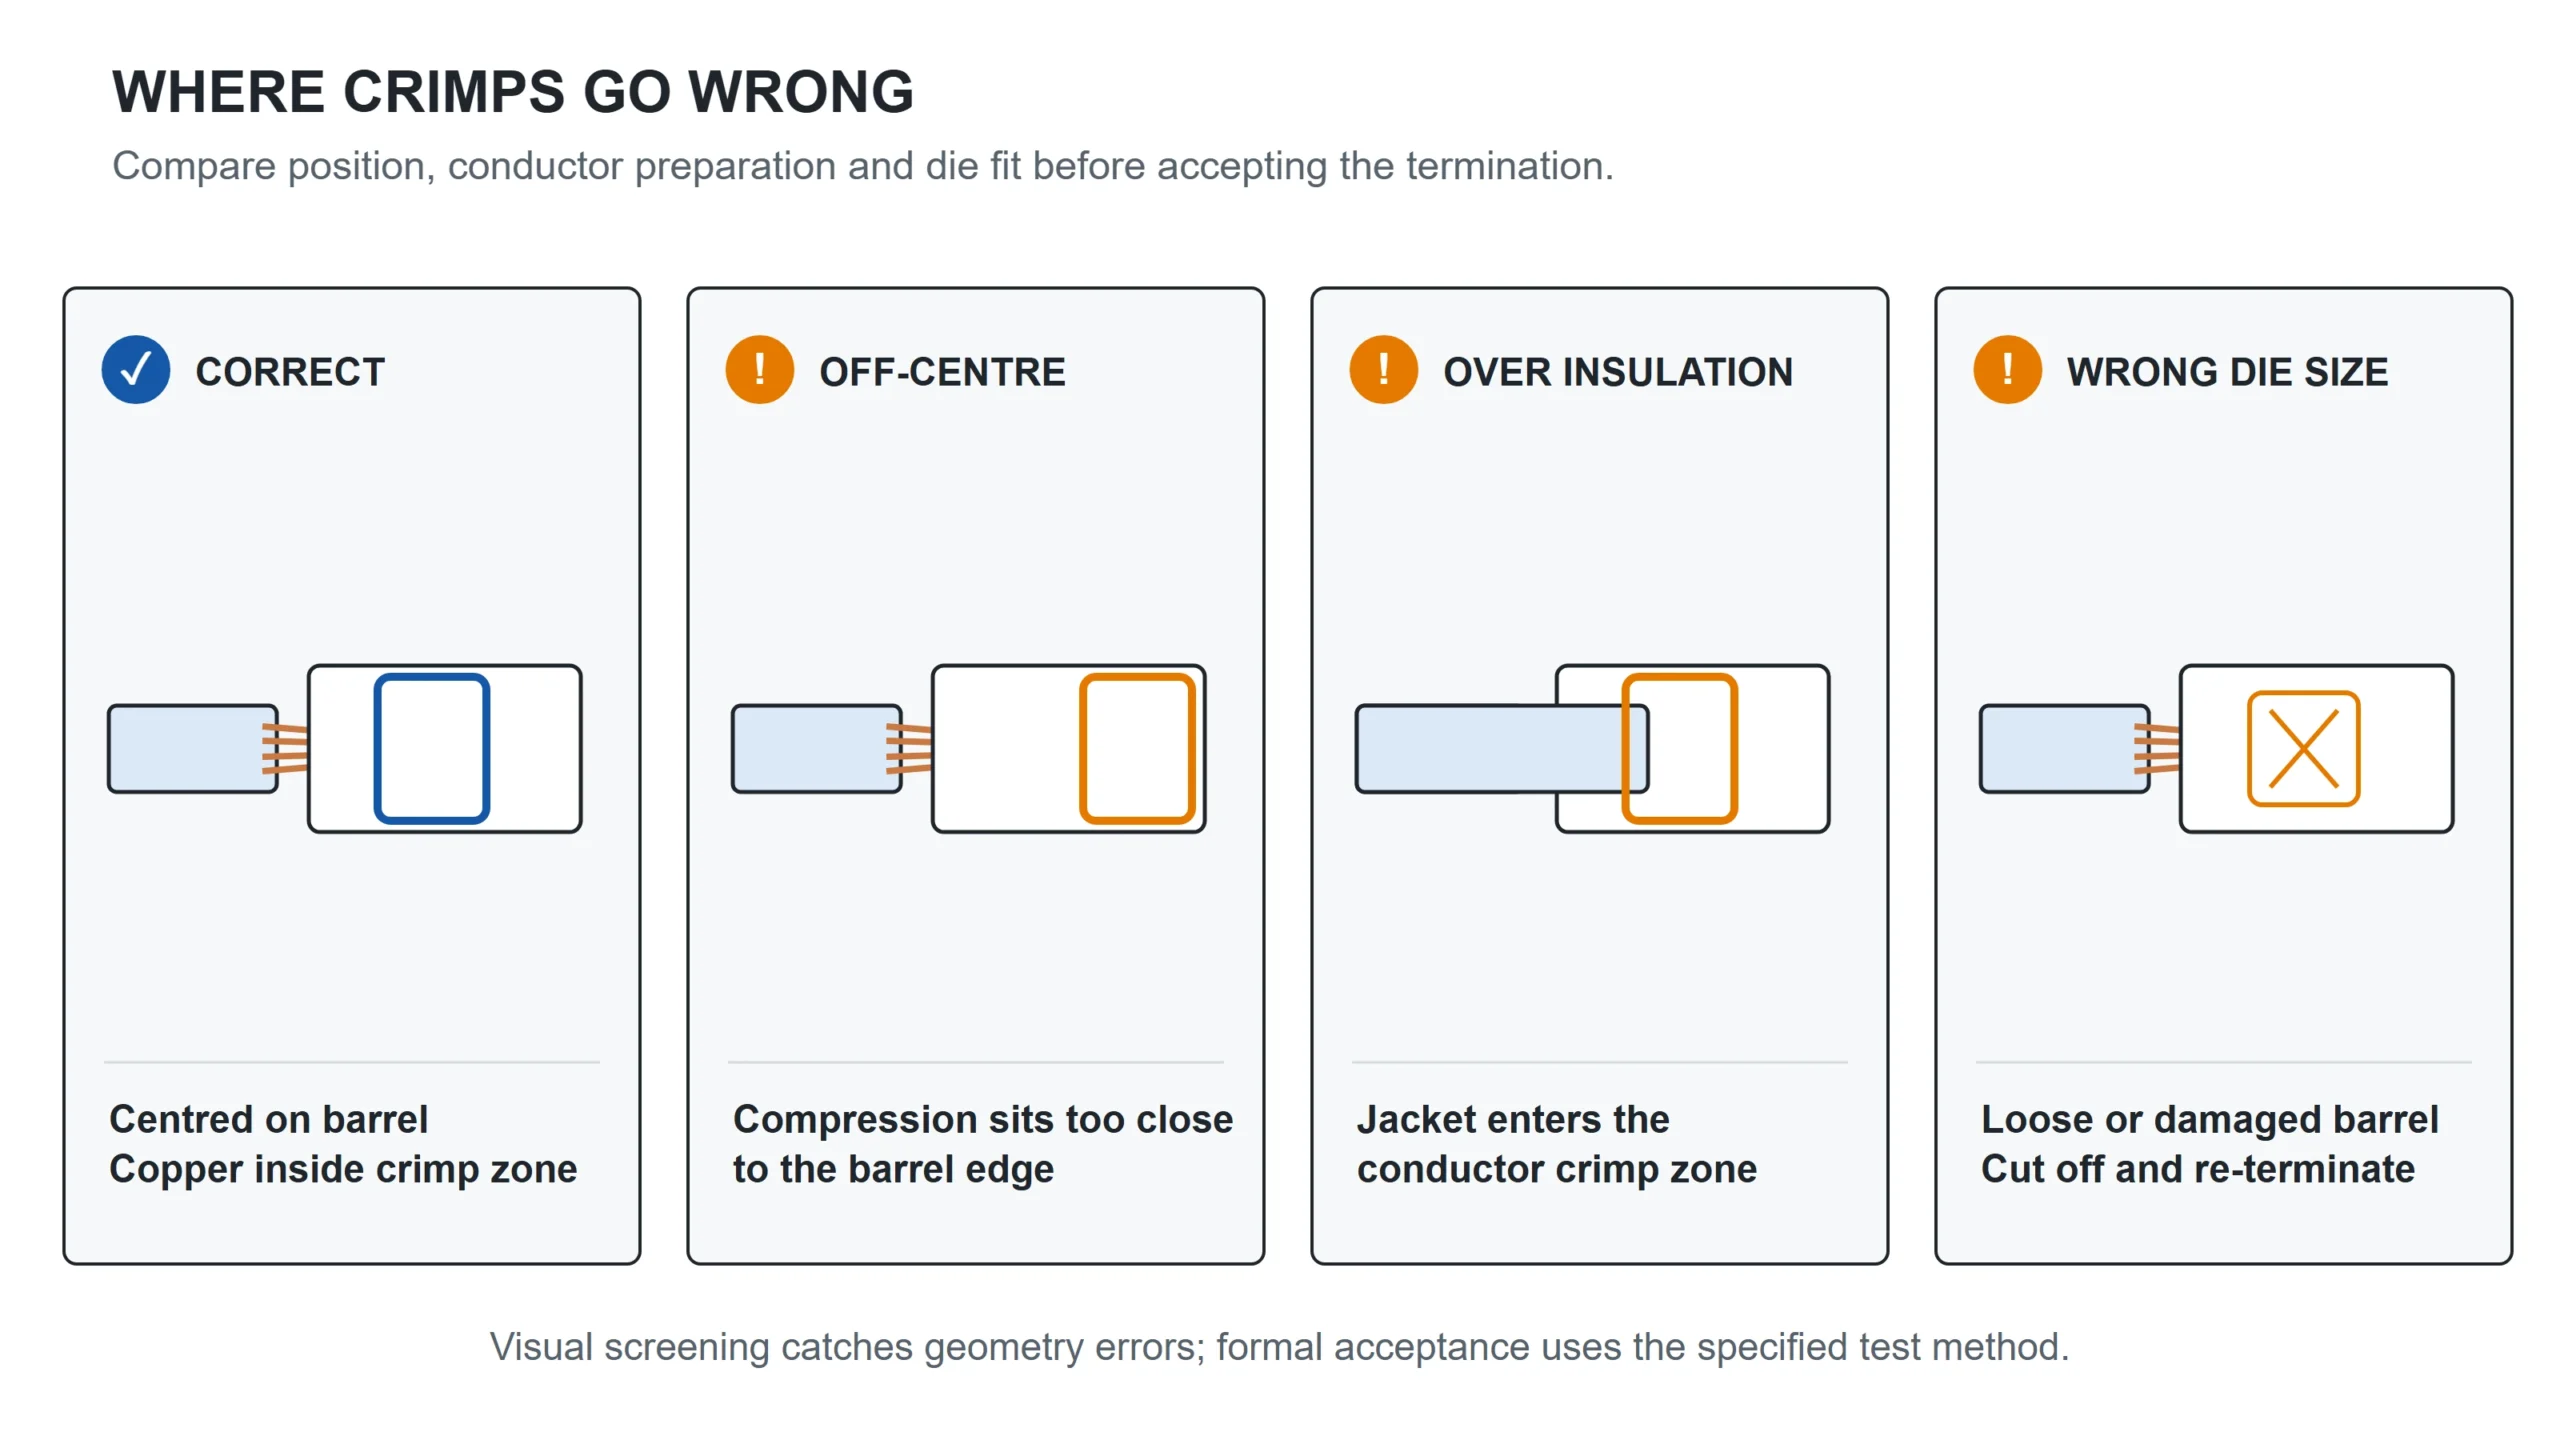
Figure 5 puts a correct crimp beside the three defects that are hardest to spot once the connector is in a terminal.
Checking the result happens at two different levels, and conflating them causes real problems in certified work. A light hand check can expose an obviously loose crimp, but it is only field screening and does not establish a test result. Formal acceptance means controlled pull-force testing against the values and method in IPC/WHMA-A-620, using a calibrated gauge. Use the field check to catch obvious failures; use the instrument when someone has to sign for the work. The full inspection sequence for ferrules, including what to look for in the barrel and collar, is in the ferrule crimping guide.
FAQ
What does a crimping tool look like?
Most hand crimpers look like heavy pliers with a shaped cavity instead of flat jaws, plus a ratchet mechanism near the pivot. The quickest way to identify the class is to look at that cavity: a square or trapezoidal nest with a size selector is a ferrule crimper, colour-marked oval nests are for pre-insulated terminals, and a hex profile with removable die halves is a lug crimper. Figure 1 labels the parts.
Can I crimp without a crimper?
Not reliably. Pliers apply force at one uncontrolled point, so the barrel flattens instead of closing evenly around the strands, and no gas-tight seal forms. The joint usually passes a pull on the day it is made, then heats up under load as oxidation raises resistance at the contact faces. For a one-off repair outside a panel it may hold; for enclosure wiring it is not an acceptable termination.
Is an RJ45 crimper the same as a wire crimper?
No. An RJ45 or modular crimper pushes the contacts of a plastic plug down through the cable jacket onto individual cores, which is a different mechanism from compressing a metal barrel around a conductor. The dies are not interchangeable, and neither tool does the other job. They share only the name.
What is a crimping tool used for in a control panel?
Mainly two jobs. Ferrule crimpers, known as bootlace crimpers in UK practice, terminate fine-stranded control conductors so they seat properly in terminal blocks, which is the bulk of the work in a typical cabinet. Lug crimpers terminate the earth bar and the power feeds, where conductor sizes exceed what any hand ferrule tool covers. Pre-insulated terminal crimpers appear wherever the design uses ring or spade connections onto studs.
How often does a crimping tool need checking?
Dies wear, and worn dies degrade every crimp quietly. Inspect the die faces for nicks and flattening as part of normal use, and keep them clean, since debris in the cavity changes the finished geometry. Tools used for certified work should follow the calibration interval set by the tool manufacturer or the quality system governing the build.
Matching a tool to the ferrules it will crimp
Because a crimp is only as good as the die that forms it, the tool and the ferrule are chosen together. The Termnex range covers insulated, twin and non-insulated ferrules in the DIN colour system, with ratchet crimpers for the common panel cross-sections. Tell us the sizes you terminate most and the terminal type they feed, and the pairing can be checked against the terminal data before anything is ordered. Contact us.